


Property Tax Portal User Guide
Property Tax Portal Basic Navigation:
- In the upper left corner is the municipality’s logo, which links to the municipality’s website.
- In the upper right corner, there are 5 icons which are navigation links.

 The house icon links to the Home page (this will either display an information screen for visitors not logged in, or a welcome page for Users who have logged into the Portal).
 The Accessibility icon. When a user clicks this icon, they can check a radio button to Turn Accessibility On and choose a colour scheme for the screen. With this option selected, a Narrator/Screen Reader can be used to navigate the system.
 The envelope icon is the Contact Us option that will open a new email addressed to the Tax Department email account, tax.info@brantford.ca.
 The silhouette icon is either New User or My Profile. The option will change depending on if user is logged in or not.
 The Login / Logoff icons will change depending on if the user is logged in or not.
If you have logged in before:
- Click the Login icon.

- On the User Login screen, User enters:
- CAPTCHA details, if applicable.
- Email address and Password and then press Login.
- User will be required to enter a verification code.
- Email will be sent to the User’s email address with a 6-digit verification code.
- User enters this code on the “User Verification Code” screen.
How to Create a New Property Tax Portal User
- At the top right of the screen, choose the New User icon and fill in the required fields on the Create New User page.
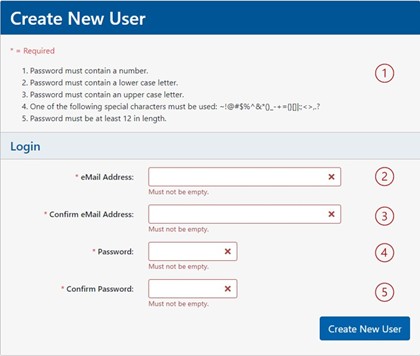
Figure 1 - Create New User form - Read the password rules
- Enter an email address and then confirm it by entering it again.
- Enter a password and then confirm it by entering it again.
- Click Create New User.
- The email address entered becomes the user’s login account.
- An email will be sent to the email address used, with a link to activate the account.
- Click the link and then log into the Portal.
How to Register Your Tax Account
- Click "Add Account" in the menu options on the left of the screen
- Fill in the Roll Number field with your 19-digit number found on your tax bill (spaces can be included or omitted)
- Enter your Access Code, found on your tax bill
- Enter your Owner Name as shown on your tax bill (Last Name First Name and Middle Name, if applicable)
- Click Register
- You should be taken to the Account Information page. A green banner will state “Account Registration Successful”
- If any of the three pieces of information was entered incorrectly, you will see a red banner with an error message “Invalid Account Details” on the screen and will have the opportunity to fix the incorrect field(s).
How to Update Tax Notice Delivery Method
If you would like to receive your tax notices via email, instead of receiving a paper copy:
- Select "Contacts & Delivery Methods" in the menu options on the left
- In the "Delivery Method and Mailing Address" section, click the link to “Update Delivery Methods”
- Change the Tax Notice Delivery Method field dropdown from Paper Billing to eBilling
- The email address field will now display with the email you used to log into Property Tax Portal. (Although the mailing address information does not display anymore in this section, it is still visible under Letters and Other Notices).
- Click Save.
- The Change Request Log table will now be visible and have a record in the table indicating there was a Delivery Method Change. Columns include: Reference, Request (i.e. Delivery Method Change), Details (e.g. New Delivery Method: eBilling), Request Date, Status (Completed); Status Date (when you made the change) and Response (which will be blank).
- If you wish to revert to paper billing, repeat steps 1-5 above, but choose paper billing in the Tax Notice Delivery Method field dropdown.
NOTE: Your tax notice delivery method and eBilling email address will be updated in the municipal Property Tax office. You should receive an email stating that your delivery method has been changed.
How to Request Mailing Address Change
- Logged into Portal with an account selected, click "Contacts & Delivery Methods", the option from the menu buttons on the left.
- In the "Delivery Method and Mailing Address" section, click “Request Mailing Address Change” link
- A new screen appears. Fields can be edited and buttons for Cancel and Send Request are both active. A green banner near the top of the screen advises which Tax Accounts will be affected by this Mailing Address Change. (i.e. if you have other Tax Accounts linked to your login).
- Choose a Country format, and fill in required fields (flagged with a red asterisk *)
- Unit-street address
Note: Currently, even if you are not changing the information, you must fill in the Unit-Street Address field. - City
- Province
- Postal Code
- Unit-street address
- You may enter any additional notes for the Tax Department into the Notes field.
- On the bottom right of the screen you have two options – Cancel and Send Request. If you Cancel, you are returned to the Contacts and Delivery Methods screen and any address changes you entered are lost.
- If you click Send Request
- You are returned to the Contacts and Delivery Methods page.
- The Request Mailing Address Change link is no longer visible
- The Change Request Log will now have a record in the table indicating there is a Mailing Address Change request. Columns include: Reference, Request, Details (displays the address but Province is not visible, you see CA which is Canada), the Request Date, Status (Pending), Status Date, Response and Actions.
- In the Actions column there is an option to Cancel the request any time prior to the change being approved by the Tax Office
- Once the Tax Office processes the mailing address change request you will receive an email stating your request has been approved or declined, and any next steps.
- You cannot cancel a mailing address change after the change has been processed by the Tax Department. You will have to submit a new mailing address change request.
How to Sign Up for PAP
- Log into Portal
- Select Account and click on "Pre-Authorized Payments" from the menu options on the left.
- Current Enrollment should say “Not currently enrolled.”
- Click Sign Up.
- Fill in the blanks
- Select Pre-Authorized Payment Plan from the dropdown
- Enter your Financial Institution number (see the sample cheque for where to find the number)
- Enter your Branch Transit Number (see sample cheque)
- Enter your Account Number (between 7-12 numbers)
- Attach a scanned image of your personal voided cheque or a bank documentation that represents a voided cheque (use the browse button)
- Notes are optional
- Read the Terms and Conditions and select “Yes, I agree to the Terms and Conditions".
- Click Save.
The screen will change you will see a green banner that says PAP Request Submitted. Another green banner, under the “Current Enrollment” header will show “Enrollment Pending”.
A Change Request Log table will also be visible and will show the current status of your request as “Pending”.
Prior to your request getting processed by the Tax Department, you will see “Cancel” in the Actions column. You can click the link to cancel your PAP enrollment request.
Once someone in the Tax Department processes your request, the status will change to “Approved” or “Declined”. There may be a reason provided in the Response column. You will receive an email with details about your request. You will also receive, if applicable, a letter to your mailing address or email address, outlining the pending payment dates and amount to be withdrawn, related to the plan you signed up for.
Note:
Once the request has been processed, the options in the Action column will change to Stop and Update.
IMPORTANT: If you click Stop, it may take up to (5) business days to cancel your PAP plan, so the next scheduled payment may still be withdrawn.
If you click Update, you will need to fill in all the fields listed in the “How to sign up for PAP” section above and click Save again.
To add a new PAP, please submit your application at least seven (7) business days before your preferred withdrawal date. We also require five (5) business days’ notice prior to the next scheduled payment withdrawal, to change banking information, change of payment date, or PAP cancellation.
How to Request a Statement of Account
To request a Statement of Account for any year you owned the property:
- Log into the Tax Portal
- Select Account and click "Statement of Account" in menu options on the left
- Click the “Request New Statement of Account” button
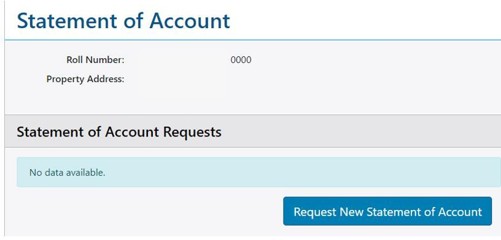
Figure 2 - Statement of Account - Request New Statement of Account - Fill in the start and end dates and click Submit Request
Note: the date fields have certain restrictions as to how far back in time you can go.
(e.g. You cannot request a statement of account where the start date is before you owned the property; nor can you request statements that extend beyond your ownership date.) Also, statement of account dates cannot be prior to February 1, 2024. If you require a statement prior to February 1, 2024, please contact the tax office.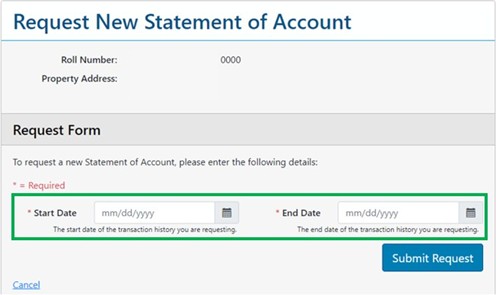
Figure 3 - Request New Statement of Account form - You should be taken to a new page “Statement of Account”, where you can see a list of any Statement of Account Requests you have made (including the Statement start/end dates). In the Actions column – click on the hyperlink View Statement.
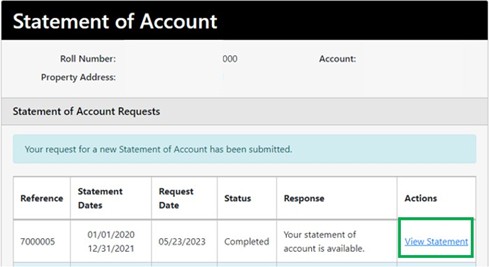
Figure 4 - Statement of Account Request table - At this point, you can view the report online or download it as a PDF. (If you are planning to download the report, do not close the Property Tax Portal until you have saved the report locally.)
- In Property Tax Portal – you can now request a new statement for different dates, click another menu option, or exit the site.

 Subscribe to this Page

